 English
How to Format a Drive for Mac & PC Compatibility
Formatting a hard drive or USB flash disk to be compatible with a Mac and Windows PC is extremely easy, I’ll walk you through the process in a few simple steps. Keep in kind that formatting a drive erases all data contained on it.
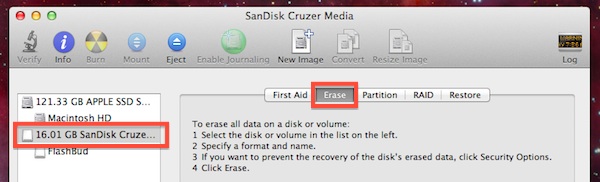
- Launch DIsk Utility. You can found within /Applications/Utilities/
- Connect the drive you wish to format
- Click the drive name on the left side list in Disk Utility, and then click the “Erase” tab
- Click the pulldown menu alongside “Format” and choose option “MS-DOS (FAT)”
- Give the drive a name if you want
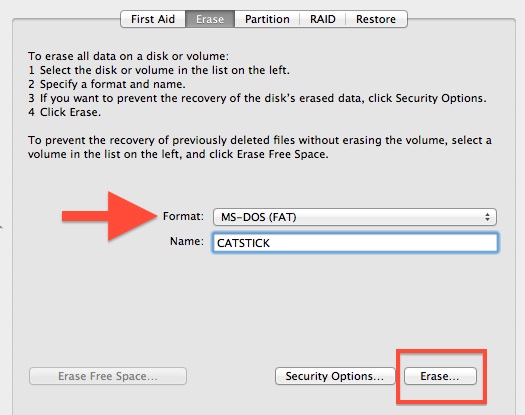
- Click on the “Erase” button to format the drive for Mac & Windows PC
If you wish to boot the drive on a PC or use it with older versions of Windows, you may also need to set the partition scheme to Master Boot Record (MBR) for full Windows compatibility:
- Click the drive, then select “Partition” tab
- From the “Partition Layout” dropdown menu, select “1 Partition”
- Click “Options” and choose “Master Boot Record” as the partition type, then click “OK” and “Apply”
Drives format very quickly, though the total time taken will depend on the size of the drive.
The resulting file system is compatible with all versions of Mac OS X, Windows 95, 98, Windows XP, Vista, 7, even Windows 8, it’s one of the most widely recognized and usable file system formats. This makes FAT an ideal file system to use for USB flash drives or external hard drives that are intended for use in environments with multiple operating systems. The primary downside to using FAT32 is the file size limit, which limits files on the drive to being 4GB in size or less. If you require single files to be larger than 4GB, use exFAT instead, though you will lose some compatibility with older versions of OS X and Windows.
If you only intend on using the drive on a Mac it’s recommended to format for Mac OS X use only using the journaled file system. Just be aware that the Mac-only formats are typically not readable by Windows Machines.

Leave a Reply